Clickable Area Element
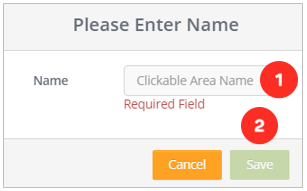
1. Name the clickable area tool you will create.
2. After naming Clickable Area, save it.
Editing Clickable Area Element Settings
When we successfully add the Clickable Area element to the layer, it will appear on the screen as follows.
1. "Clickable Area" element added to the layer.
Once I click on the element on my layer, the system will open the settings of the element clicked on the right side of the screen.
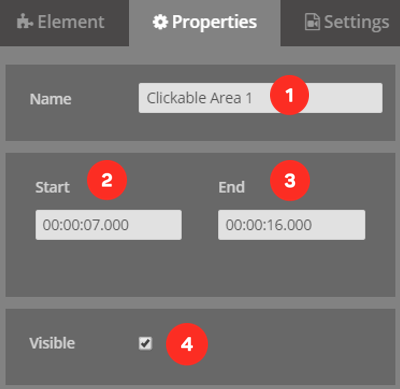
1. Name field of the widget you added.
2. Area showing when the element will enter the screen.
3. Area showing when the element will exit the screen.
4. Option you need to click when you want the tool to visible on the screen.
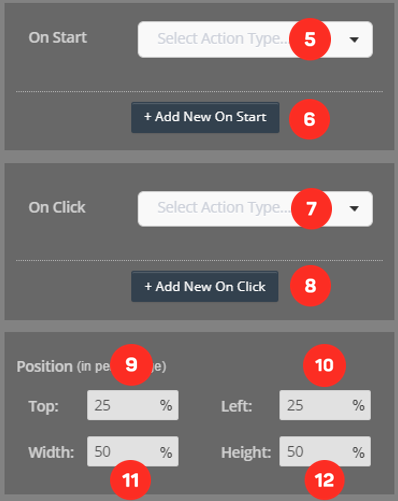
5. Select the action you want to take on the video as soon as the element is on the screen.
 Click here to see all the actions’ explanations.
6. Add the new action you want to take on the video as soon as the element is on the screen.
7. Select the action you want to do in the video when the element clicks on the screen.
 Click here to see all the actions’ explanations.
8. Add the new action you want to do in the video when the element clicks on the screen.
9. The distance of the element you added from the top of the screen.
10. The distance of the element you added from the left of the screen.
11. Width of the element you added.
12. Height of the element you added.
13. Button to color the element.
14. Adds a certain flashing on the screen when the element you add is clicked.
15. Make your Clickable Area element flash on video.
16. Round the edges of your Clickable Area element.
17. Button, where you can save the properties you changed.
Related Articles
What is Video Element in Cinema8
With the Video element, you can add videos on your video in full screen. If you want, you can activate a button where you can allow them to pass the video you put when the time expires. First, we drag and drop our element from the Elements list to ...Sticky Hotspot Element
What is Sticky Hotspot? By marking an object in the video with a Sticky hotspot, you can follow the object you marked while the video continues to play. In this way, you can assign actions to moving objects in the video. For example; Imagine a woman ...Countdown Element
With the Countdown element, you can add countdown anywhere on your video and trigger actions at the end of the countdown you add. First, we drag and drop our element from the Elements list to the layer. The screen below will meet us. 1. Name the ...Drawing Element
Drawing element allows you to draw on your video. There are 6 different types of drawing in the tool. There are also color options for the drawings you will make. First of all, we drag and drop our element from the Elements list to the layer. Here ...HTML Element
HTML is a system used in the preparation of websites. Browsers mirror the screen by processing HTML codes. So, what can we do in Cinema8 with the HTML element? With the HTML element, you can place all the elements that give embed code (such as ...


