Creating Your First Interactive Video Project
Login to Cinema8 Creative Studio before creating an interactive video. After login, you can start working by selecting the video you will add interaction to. Let's look at how we can create an interactive video project.
Video Upload
First of all, you should upload the video we will use in the system.
Select a video for your interactive video project by uploading it from your computer to Cinema8.
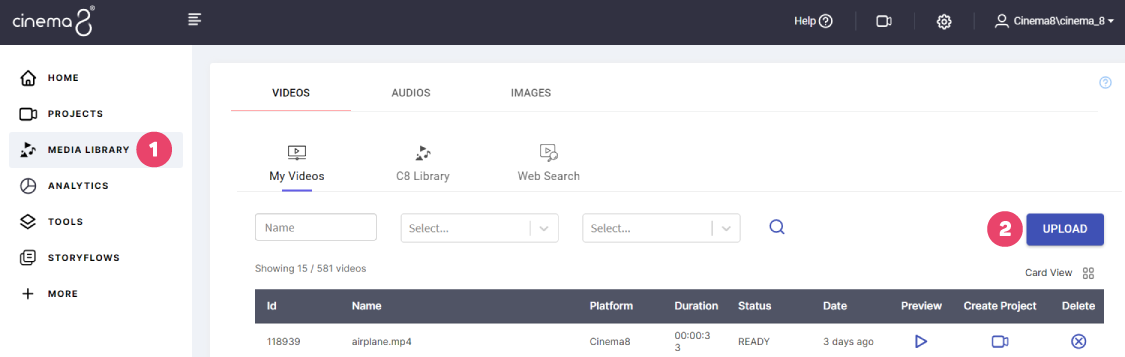
1. Click on the “Library” button from the left panel. My videos list is the area where we can see the videos we have uploaded before.
2. Click the “Upload” button.
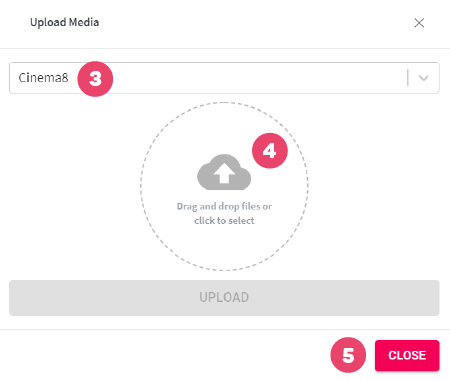
3. By clicking on the field in the popup window, select the Cinema8 platform. If you have a synced video account, you can also select them.
4. Click on the field and select your video file to upload from our computer. You can also start the video upload process by dragging and dropping the file into this area.
5. After uploading process is completed successfully, click the “Close” button to close the uploading window.

Step 6: Then, return to the “Library” screen and wait for the video to be processed by the system. The standby time may vary depending on the size of your video. Your video will be ready to use after processing. All you have to do is to click the “Create Project” button next to your video and to create a project. Click if you want to look at the project creation screen in detail.
 Info: You need to wait a while before the newly uploaded videos to Cinema8 become available. As you can see in the screenshot, the “Create Project” button is not active for a newly uploaded video. When the “Status” of the video is -READY-, your video becomes ready to use and the “Create Project” button is activated.

1. Click on the “Projects” button from the left panel. Projects is the area where we can see the interactive video projects we have created before.
2. Click the "Create Project" button to create a new project.
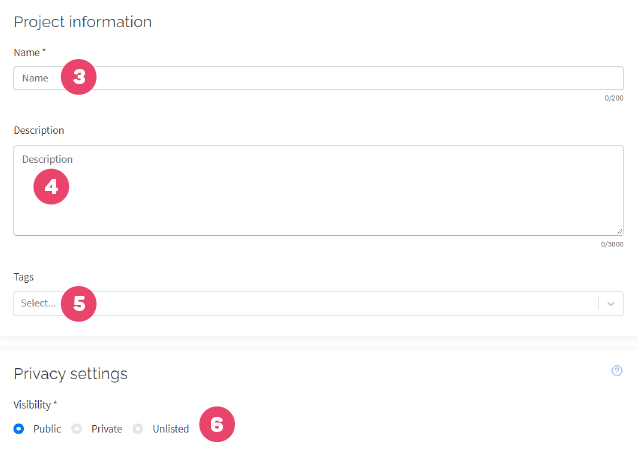
3. Enter the name of the interactive video project.
4. Enter the description of the interactive video project.
5. Enter the tags of the interactive video project.
6. Select the visibility feature of the project.
Public: When you select this option, your video will be available to all users.
Private: When you select this option, you will see two customization options. The first one is the “Password” option. The password entered in this field is now the login password for your video. Anyone who do not have this password will not be able to watch your video. The second one is the “Domain Restriction” option. When you type a URL in this field, your video will only work on that URL. The third is the "Private Token" option. Creating a personal access token allows you to send interactive video URLs to your users or customers and easily track them through analytics. You can create multiple private tokens for a video and send them to multiple people.
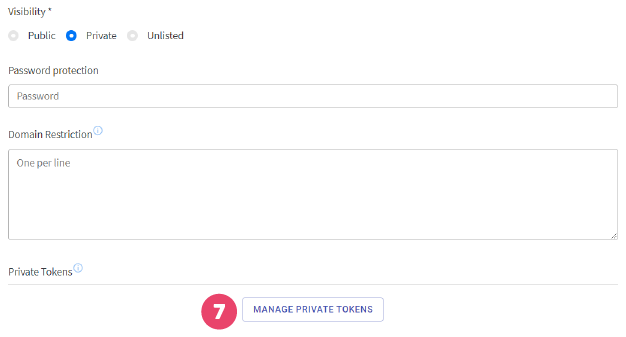
7. Click to create a Private Token. This button will appear as active when you come to the project settings after creating the project.
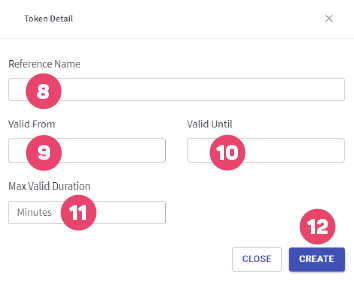
8. Define a name for the URL to be shared.
9. Determine from what date the video will be valid.
10. Determine the expiry date of the video.
11. Set how many minutes the video can be watched.
12. You can see the video access date here. If the video is not watched at all, there will be no change in this area.
Unlisted: When you select this option, your video will not appear to all users, only to the user groups you have selected.
 Click here to learn how to create user groups
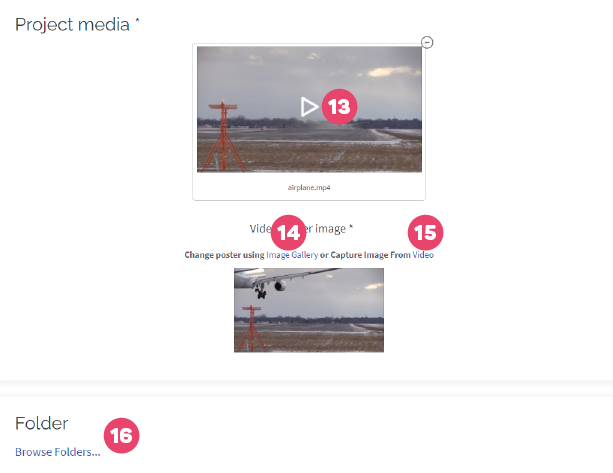
13. You can change the source video of the interactive video.
14. Click on the “Image Gallery” button to select a preview image from the image library.
15. Click on the “Video” button to take a screenshot from the video to select a preview image.
16. Select the folder where the project will be located.
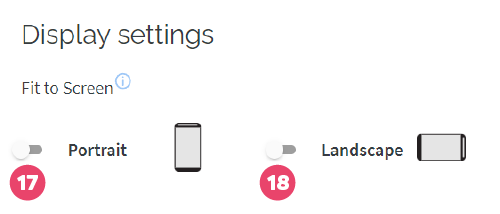
17. Fit video to screen in horizantal for mobile screens.
18. Fit video to screen in vertical for mobile screens.

19. Mark this option to make interactive your 360 video.
20. Finally, after completing the required fields, click “Save” to create the project.
Related Articles
What is Video Element in Cinema8
With the Video element, you can add videos on your video in full screen. If you want, you can activate a button where you can allow them to pass the video you put when the time expires. First, we drag and drop our element from the Elements list to ...Introduction to Cinema8 Interactive Video Platform
Cinema8 is an interactive video development platform founded by Gobito Digital Solutions in 2017. Cinema8, which meets the video needs of enterprise or individuals with its features such as production, hosting, broadcasting, and reporting, continues ...Creating an Interactive 360° Project in Cinema8
Login to Cinema8 Creative Studio before creating an 360° interactive video. After login, you can start working by selecting the video you will add interaction to. Let's look at how we can create an interactive video project. 360° Video Upload First ...Creating Storyflow Project
Storyflow is the Cinema8 feature that allows you to link interactive videos you have previously created. You can place questions between these interactive videos that you have connected and determine the video to play according to the viewer’s ...Using 3rd Party Video Streaming Servers
Before creating an interactive video in Cinema8, you should have a linear video. So, let's look at the ways to select the video you will use. - Video Upload to Cinema8 (Streaming and Storage) - Cinema8 Stock Video Library - Synchronizing Another ...